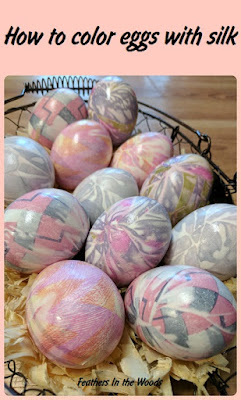
I have chickens that lay white, brown, blue, green and speckled eggs...I really don't need to dye Easter eggs! However, in the interest in knowledge and experiment I decided to figure out the silk tie dye thing. Turns out, it was pretty darn easy!
All your going to need are ties, an old t-shirt, some string, some vinegar and water. Oh...and the eggs. White of course!
How to color eggs with silk
You'll need to get a few silk ties. Make sure they're 100% silk, blends don't work as well. I bought the ones for this experiment at a thrift store. I paid $6 for 4. You could use silk scarves instead, but I found they were much more expensive.
You'll also need some string or elastic of some sort (I used embroidery thread) and an old white shirt or pillowcase. It helps if you have a seam ripper and you'll need scissors. Oh...and a pot, water, vinegar and white eggs.
First, deconstruct the ties. If you've ever used a seam ripper to take apart a piece of clothing before you will be amazed at how fast ties come apart! They have a bit of stitching at each end, then just pull the string and the whole thing separates. You won't need anything but the printed fabric so put the rest aside.
I'm sure somebody somewhere has exact measurements on this but I just sort of eyeballed it. Spread the tie out print side up (this is really important) Lay an egg on it and wrap the tie around the egg till the ends meet and can be fastened. Tie with embroidery thread then cut off from the rest of the tie.
Make sure the fabric is pretty tight against the egg to prevent missed spots. The colors won't transfer well in loose areas. I did 3 eggs for each tie, but could have done a fourth. I ran out of eggs.
After all the eggs are wrapped in silk and fastened, do the same thing with the white shirt wrapping it over the tie, cutting and fastening again.
Place all the wrapped eggs in a large pot with water and 1/4 cup of vinegar. Bring to a boil. Boil the eggs for about 20 minutes then remove from heat and drain. Once cool unwrap your eggs.
They say you'll be able to use the silk pieces again and again. I've only used them once so I'm not sure, but it was a super easy way to get some complex patterns. I did notice that even the ugliest tie I bought made some pretty colors.
The egg colors ended up a lot lighter than the tie, so don't be afraid of dark colors or funky patterns. Oh and if you happen to find out what next years Easter egg trend will be...a little heads up would be nice! 😉
~L
Want gardening and healthy living information sent right to your email weekly? Click right here to join my newsletter list and get new posts sent directly to you the day they're published!


Thanks for sharing on the Pleasures of the NW's DIY Party! These are beautiful!
ReplyDeleteI have so many silk ties that I was going to donate! After reading this I know what I am doing with them! Great ideas here and so pretty!
ReplyDeleteWish I had some silk ties, your eggs are beautiful! Pinning to share. Thanks for sharing your project with us at Brag About It!
ReplyDeleteThat's a pretty neat way to dye eggs! We've tried the shaving cream ones, we've made volcano eggs with colored baking soda and vinegar.. this year we're going to try dying eggs using bleeding tissue paper.
ReplyDeleteWe tried this one year and it does work really well, our colors turned out really bright too. Thanks for sharing with us at #CCBG
ReplyDeleteHow fun are those?! We did the nail polish eggs one year...what a disaster. But this looks like it could be a lot of fun to do with the kids. I might even get to teach them something while I'm at it! Thanks so much for sharing at the #happynowlinkup!
ReplyDeleteGreat colors from this technique. Sounds like everyone had fun :) Thanks for sharing with us at Creatively Crafty #ccbg :)
ReplyDeleteSuper fun! We did this just one year and the results are amazing! Thanks for sharing with SYC. I read your fairy garden post, but could not get a comment window to pop up. Thanks for sharing with SYC.
ReplyDeletehugs,
Jann